Saturday, August 31, 2013

Catching Up

Hi friends! Sorry to have seemingly abandoned my blog for so long but life has just kept me very busy. Since the last surgery on my right arm, it has finally healed well. I am able to do all the things I could before the accident except straighten the arm completely or, bend it totally to touch my shoulder. The only time it bugs me is when I put my face cream on my face and neck so that's not so horrible and I have learned to use my left hand for this and many more tasks.
 
Another big change is that I have lost 75 pounds! I'd still like to loose a bit more but we'll see. My kids are afraid I may get too thin! It is so wonderful to be able to buy clothing in the "regular" sizes rather than the "plus" size section! I've gone from a size 24 (3X) to a 14-16 (L). Sorry about the self portrait but that seems to be the only way lately that I get any pictures of myself. 
For the past week, I've been helping my daughter make a quilt. She is expecting a little girl! We are really excited so we picked out some fabrics to make an owl quilt for when she is born. Due date is Oct 8th. 
This little guy keeps us both busy most of the time and likes spending time in the sewing room. He has grown so much!
This is the little sweater I made for him. Currently, I'm also knitting a blanket for the new baby. 
Hopefully, I will do better at keeping up with my blog in future! 

Until next time, happy sewing!

Saturday, November 17, 2012

Latest Projects


It's been a long while since I checked in here. My recovery from the accident has been slow. I had to have yet another operation on my right arm because, after 6 months, the bone had not yet 'joined' so I needed to have a bone graft. With each surgery, the incision gets longer and the plate gets larger. At least now, after this last surgery, I no longer am experiencing pain in it.

I have begun doing a bit of knitting and crochet - small things that don't weigh much. I have not been able to get back into doing any hand stitching yet because I'm not able to use the rotary cutter to prepare fabric. Besides, my sewing room has become a real mess again! It will take a few days work to put it all back in order.


Here's a couple of projects I've made - crochet slippers for my Granddaughter in Germany. She has already requested another two pair! If you want more information on these, please go to my Ravelry project page.


And, scarf for me!


Next, I am going to try knitting a Baby Surprise Jacket by Elizabeth Zimmerman for my little grandson.


Wednesday, June 27, 2012

Broken Arms?


Q:  What can you do when you have two broken arms??
A:  NOT MUCH!

Q:  How did THAT happen?
A:  I went off the road and down an embankment in my car on April 12th.

Q:  Was there anyone else in the car?
A:  My granddaughter was with me in the car. She came away with only bruises and a cut from her teeth on her bottom inner lip.

Q:  Were you hurt?
A:  Yes, I spent 5 days in the hospital. Both bones in my left forearm were broken, my left hand was smashed quite badly and one bone in my right forearm plus the right elbow was dislocated. I had surgery where they screwed plates over the breaks to help repair them. I had a 'half cast' on each arm for two weeks until the casts and staples (51) were removed.

Q:  How is your recovery going?
A:  I needed a second surgery on my right arm. I had been told not to do anything, lift anything etc. That proved very difficult to do so I ended up pulling the screws out of the bone on my right arm and had to have another surgery on the 18th of May. After another two weeks in a 'half cast', the cast was cut off and 27 staples were removed.

Q:  What are your orders now?
A:  I am not to lift more than 1 pound with my left arm and no more than my Ipod with my right for the next 4 weeks. I am doing my very best to remember that as I do not want to have any more surgeries!

Q:  Where are you now?
A:  Since I am not able to care for myself, I am staying with family who are doing doing a wonderful job of taking care of me.

Q:  What is the hardest part of your recovery?
A:  Boredom!  I'm used to doing things with my hands... knitting or hand sewing of some kind.

Q:  How badly was the car damaged?

A:  The car was totaled. I did not have replacement insurance so I am now without a vehicle.. not that I am able to drive for a while anyway!

UPDATE:  I somehow got a staff infection in my right arm that I am fighting. I was on a 10 day course of some very strong antibiotics but, 1 day after finishing them, the redness and heat was back. After a visit to emergency, I now have a shunt in my hand and have to administer IV medications every 8 hours.  Hopefully, this will do the trick!
 

Thursday, May 31, 2012

Fresh New Little Person

Welcome my 4th Grandson!!  What a little sweetheart.

Makinley - born at 11:57AM March 8th, 2012  7 lb 1oz
I was fortunate enough to be able to be there for his birth. Welcome to our family little one.

Grammie

Sunday, January 29, 2012

A Flower in the Snow


I found this wonderful post on a fellow Canadian's blog that really hit home for me today. It is something I know I will need to read again from time to time so, I thought I would share a link.

The post is written by Donna at Funky Junk Interiors and is called Are you a flower in the snow? ~ inspiration for hard times
 
 Here's hoping we can all push through the snow...


Friday, January 6, 2012

New Antique Grandmothers Flower Garden Project


A few months back I purchased 80 hand pieced antique Grandmothers Flower Garden units on eBay. I had hoped to use them as is. The first thing I did after looking through all of them was to hand wash them. They were soaked in groups of 10 at a time in the bathroom sink using baby shampoo. I still can't believe how brown the water became after each group was washed. After rinsing, they were laid out to dry. When laying them out, I noticed that many of them were poorly sewn and many had pleats and puckers sewn in. Not all were the same size either.

I decided that the best route to go would be to take the blocks apart and re-do them using English Paper Piecing. I took the first 10 apart keeping the pieces for each motif together. They were ironed flat and the pieces for each flower held together with a clip.

When I measured the hexies, I thought I'd be able to use 3/4" hexagons. I ordered the paper pieces I'd need and then waited. They arrived about 10 days later so I set about basting the first pieces. That's when I discovered that some of the pieces were cut just a bit too small. I need to go with a smaller paper piece.

Once again, I went online to see if I can find 5/8" paper pieces. I found that Paper Pieces website will custom laser cut 5/8" pieces as well as other odd sizes! I ordered them and set about waiting again. Another two weeks passed by until they arrived in my mailbox. I basted a few pieces and this size is perfect! Now I can really get this project going!


Wednesday, January 4, 2012

Happy New Year & Goals

Yikes... I just looked at my blog's archive for last year. There are only 11 posts for the WHOLE YEAR! Seems hard to believe that 2011 went by as quickly as it did. Perhaps it's just a consequence of growing older that time seems to fly by at an ever increasing speed.

I'm going to go ahead and post my list of goals for 2012 (even though I said I would never do that).
  1. Clean and organize the sewing room once a month
  2. Find ALL of my UFO's, list and photograph them.
  3. Add the UFO photos to my blog
  4. Pick 3 UFO's to finish in the next 3 months
  5. Post to my blog more often
  6. Spend less time on the computer and more time in the sewing room

Happy New Year my friends!


Saturday, December 31, 2011

Happy New Year


2011 is almost over. My hope is that 2012 will be a much better year!

Thursday, October 6, 2011

My Grandaughter is a new quilter!!

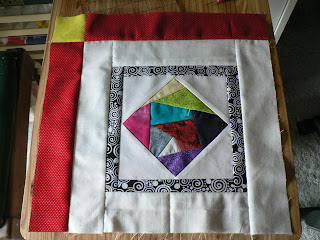
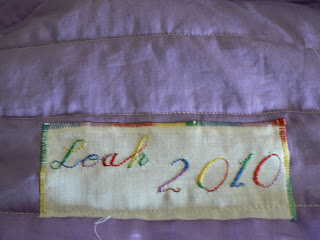
This is a very long post with lots of pictures. It is the story of my grandaughter Leah's first quilt made in the summer of 2010. I should have posted this long ago, but here it is... 
Wednesday Aug 4th - My grandaughter Leah wandered into my sewing room to see what I was doing. Looking at my sewing machine, she asked "what's this button for"? I told her I'd show her and had her sit down at the machine. I brought down a box full of scraps like the ones they used to play with when she and her brother were little and she started to pick through them. She wanted to know how old I was when I made my first quilt. I said I was 16, the same age as she is now. She asked if she could sew some of the scraps together and, from that innocent beginning, her first quilt was born!
She sewed together 12 crazy pieced blocks. I helped with pinning, pressing and trimming.  It was wonderful to work along with her and teach her about this "thing" I do and love! She made up a few different layouts with my help and decided to do her blocks 'on point' with sashing strips between.

Thursday Aug 5th - We figured out the sizes of the corner triangles that were needed to surround the center piece of each block, I cut them and she sewed them on. We went hunting through my stash and found a red fabric for sashing and borders but I didn't have enough black for her plan. She also decided that the setting blocks were going to be purple so, that meant a trip to the fabric store. After supper, we cut the borders from this funky black and white print she picked and sewed them on. She worked until 11  PM and got the white borders added on two sides of her blocks.

Friday Aug 6th- Leah went to the sewing room by herself and started pinning and sewing the last border strips to her blocks today. I'd barely finished checking my email and she was done all of them. I got busy and cut her red sashing strips. Then, she was back in the fabric closet looking for something for the cornerstones. She picked a yellow/lime green. Wow... it makes the sashing pop! I cut the purple for the setting squares, side triangles and corner triangles and she put it all up on the design wall. Here is what it looks like now.


Saturday Aug 7th - Today Leah started off by joining cornerstones to sashing strips, then sewing the sashing pieces to the quilt blocks. She moved on to start joining rows of blocks to make the quilt top. I've been helping by pinning and pressing then running back and forth to the design wall (in the next room) with blocks. We got about half of it done before this G'ma was played out! I'm sure she would have LOVED to sew all night...

Sunday Aug 8th - She finished sewing the main portion of the quilt top together!! Now, to decide on the borders and cut them. Using some of the leftover scraps, she decided on a narrow black and white border, then a white a bit wider followed by the widest border in the red with the black and white binding. I still had enough of the red and white but, we needed more of the black and white print.
Monday Aug 9th - Back to the fabric store for another .25 of the black and white print. I cut the strips for the borders and Leah joined them all into one long length. She measured and cut the first borders adding a little cornerstone of green.

Tuesday Aug 10th -  Today, she measured and cut the second borders from the white fabric and added another green cornerstone to each corner. (That was the last little bit of green that was left!)

Wednesday Aug 11th - Today we tossed around ideas for the corners on the final red border as she doesn't want to have the red as a frame type border. She decided on nine-patch blocks. I cut the squares for her and she assembled her four nine-patch blocks for the corners of the final border.

Thursday Aug 12th - Finished sewing on the final border today! Went hunting today for something to use as a backing. We checked the thrift stores for a sheet but didn't find anything she liked at either thrift shop. We went into the "Bargain" store and found a brand new 200 thread count poly-cotton sheet for $7.00 that she liked so we went with that. I also bought a set of pillowcases that she can customize with some borders to match the quilt. Also, went back to the fabric store for some batting as I didn't have a piece large enough on hand.

Friday Aug 13th - Discovered today that the sheet is not quite long enough. She picked out the top hem only to discover that it was a separate piece. I cut a couple of strips of purple and some red which she pieced onto either side of the 'hem' piece she had removed. Then, we sliced the sheet about a third of the way down and sewed in the pieced section. Now, it has some added interest and is long enough! (Sorry - I didn't get a picture of the back!)

Saturday Aug 14th - Today she did the final pressing and trimming threads on the quilt top then, after taking all the furniture out of the dining room, we laid out the quilt on the floor so she could pin baste the layers together. She finished the job around 11PM with the help of her girl-friend who was staying over. Moved the table and chairs back into the dining room so I hopefully won't be bumping into them anymore... (I kinda forgot the table was there in the living room a couple of times and have a bruise that matches the purple on her quilt!)

Sunday Aug 15th -  She started her machine quilting! Worked on sewing a line a quarter-inch or so in from each side of all the sashings.
Monday Aug 16th - Continued with the machine quilting. Got all the sashings stitched along both sides and the border stitching completed.

Tuesday Aug 17th - Leah is working very hard getting her quilting finished as she has to leave for home tomorrow! She used different widths of tape to mark her stitching lines and worked for 8 hours on it today! She also discovered what happens when you get your finger too close to the needle...
Wednesday Aug 18th - Finished the last of the quilting! Trimmed the edges and sewed on the binding. Leah will finish the hand stitching on the binding at home. Here is the final picture taken just before she had to leave.

What a super job on your first quilt Leah!! I am SO VERY PROUD of you!


Circular Knit Dishcloth

This pattern is taken from a much photocopied, old typewritten pattern that has been in my possession for over 25 years. There is no authors name on it. Following is what is written on that original pattern. Any changes or additions for clarification done by me will be shown in purple.


A VERY UNIQUE and serviceable dishcloth, the directions may be confusing at first. Just remember to TURN when it says TURN. The stitches remaining on the left needle are supposed to be there. They make it form a circle. I use mine under my teapot. Not only does it look pretty but it protects the table from the heat and any dribbles from the teapot. 


CIRCULAR KNIT DISHCLOTH - HOT PAD

Sugar'n Cream Yarn Ombres - Strawberry Cream OmbreMaterials:  1 skein (ball) Lily Sugar 'n Cream cotton yarn
Knitting needles #9 or #10 (equivalent to 3.75mm or 3.25mm - US size 5 or 3) I use a 3.25mm

Cast on 15 sts.
Row 1 - Knit
Row 2 - K 3, YO, K 11 (1 st left on needle) TURN
Row 3 - Knit
Row 4 - K 3, YO, K 11 (2 sts left) TURN
Row 5 - Knit
Row 6 -  K 3, YO, K 11 (3 sts left) TURN
Row 7 - Knit
Row 8 - Bind off 3 sts, K 2, YO, K8 (4 sts left on needle) TURN
Row 9 - Knit
Row 10 - K 3, YO, K 8 (5 sts left) TURN
Row 11 - Knit
Row 12 - K 3, YO, K8 (6 sts left) TURN
Row 13 - Knit
Row 14 - Bind off 3 sts, K 2, YO, K 5 (7 sts left) TURN
Row 15 - Knit
Row 16 - K 3, YO, K5 (8 sts left) TURN
Row 17 - Knit
Row 18 - K3, YO, K5 (9 sts keft) TURN
Row 19 - Knit
Row 20 - Bind off 3 sts, Knit all sts to end (you should have 15 stitches)

REPEAT ROW 1 THRU' 20 7 TIMES more (for a total of 8 sections - this is different from the original instructions)
Row 1 - 20 forms 1 section of the dishcloth. Completed original dishcloth has SEVEN* sections. I do 8 sections in mine to get it to lay flat. Yours may lay flat at 7 sections. When last row is completed, Bind off and sew seam.

If you have any problems following this, please let me know!