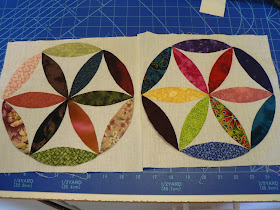
An update on my slow progress on my Joseph's Coat blocks. I have only completed two blocks so far. The first I did using the instructions as written by Kellie at Don't Look Now using glue stick to prepare the appliqué shapes. I think that perhaps my glue stick was old as it did not stick well. I found a newer one but I have found that the glue is still a bit sticky even after more than a week.
Since I was not able to find a local supplier of the Floriani Stitch and Wash Fusible nor a reasonably priced mail order source to Canada, I have had to resort to using freezer paper which I have in abundance. I decided to experiment with spray starch for prepping the shapes and found I liked it a bit better. I am able to get nice sharp points without any trouble.
Using freezer paper means that it must be removed at some point. I am stitching down one side of the 'petals' in the center of the block then removing the paper just prior to stitching the second side down. I took them out of the outer edge petals on the first block after stitching down the one side but soon discovered that they should be left in until after the blocks are joined as the outer edges have not stayed turned under. I was trying to make the block look nice to photograph and when I hit it with the iron, all those edges kinda got messed up. As a result of this lesson, the block on the left may not make the final cut unless I am able to do needle-turn on those edges. That will be determined when we get the block joining instructions.
Happy stitching!!


 I layered more sheets of freezer paper underneath the top one with the drawn petals.
  Then, I put a staple into each petal to secure all the layers.
 I then rough cut rows of petal shapes and continued to staple the next rows until all were cut.
 I took these to my comfy chair and spent an hour watching quilt shows on video while I cut all the petals out.
 Once all the petals were cut precisely, I removed the staples and separated them. (This is when I discovered that some of my stacks were accidentally welded together when I did the iron tacking trick.. so I lost a few.)
 I've decided to just use scraps for this project so I got out all my strips and ironed the freezer paper petal shapes onto the wrong sides.
  I cut out enough to make one block and proceeded to glue the edges. This is when I discovered that glue sticks can get old and become useless. The edges would not stick down. I went digging and found another glue stick and it worked better although those pointy ends are VERY fiddly and difficult to get precise. I found that it was a bit easier if I also used the Clover mini iron to heat set the glue especially on the points. (I may experiment using spray starch to prep my petals to see if it works better for me.)
  I had 12 petals prepared and the whole day was gone. Next, I need to decide just how big I am going to make this so I can find some background fabric to use. Right now, I am thinking perhaps crib or lap size....